Saturday, October 30, 2010

Halloween Series...Pumpkin Project Tutorial

Isabel Sanchez of Isa's Cakes

My last post of the 28 Days of Sweet Halloween Ideas is here,I hope you had as much fun as I did and also learned new techniques and fun projects along the way. 
Special thanks to all my guest bloggers, you are awesome, humble,talented and very kind for
sharing your talent with all of us!


As my last guest today I have Cake Designer and Sugar artist Isabel Sanchez. I meet Isabel last year through the New York City Cake Decorators Meet Up, I took one of her rice crispy treats cake topper classes and I was very impress with her  unique technique in figure molding using rice crispys . 
That's why I asked her if she could share a tutorial with us.This is a fan project and I am sure you will be able to apply it in the future for other theme cake designs.
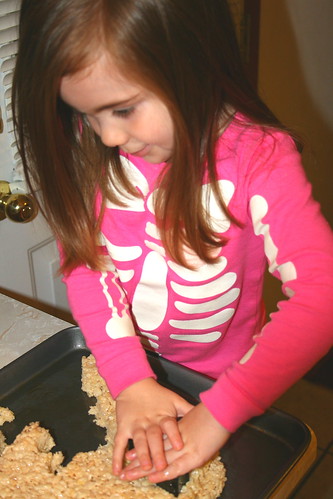


Pumpkin Project


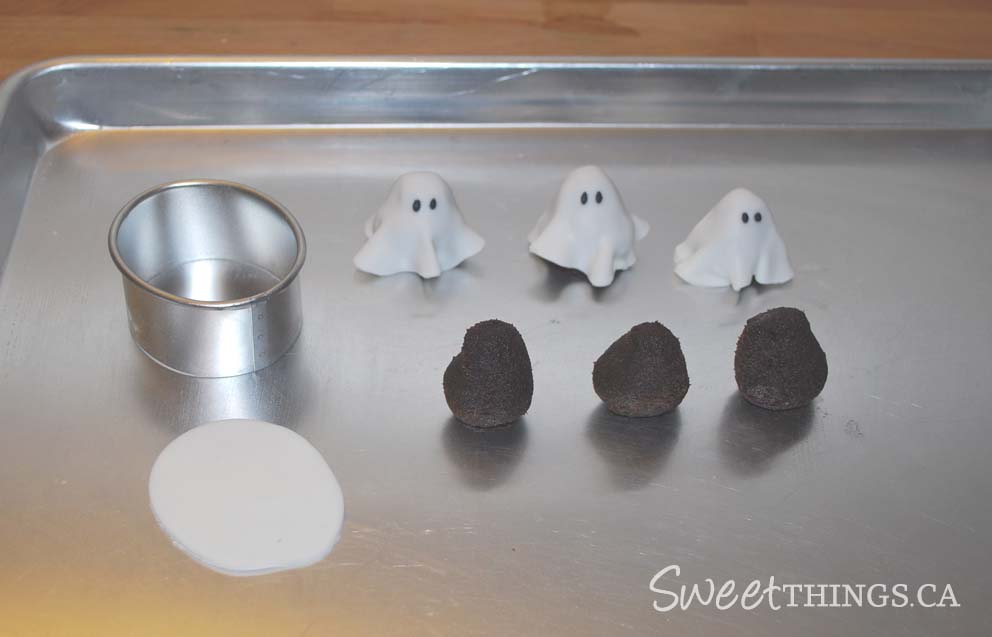
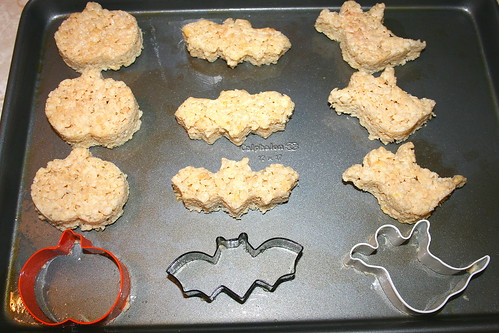
1. Make a ball of Rice Krispy Treats and carve the face of Jack of lantern .


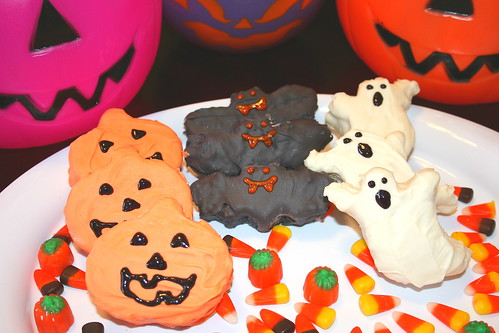
2. Tint Fondant in orange using food coloring.


3. Make sure to reshape the ball.


4. Using a cutting tool open eyes and mouth at the carving part you made before.


5. Take about 3 oz. of white fondant to make the body of the figure. Shape body about 1.5’ long


6. Shape upper paws (arms) about 1.25’ long, using a cutting tool mark fingers


7. Shape two equal balls and shape down paws (feet) and using a cutting tool, mark the toes.


8. Make head as peanut shape but one side bigger that the other one.


9. Build the figure on top of the pumpkin (Body, Legs, Feet, Arms, Head, Ears, Nose, Collar).


10. Using a liner paintbrush, paint with black coloring food all black parts. You can dilute paint in a bit of water. (Parts to paint: Ears, nose, collar, between fingers and toes, and Jack of Lantern)


11. Roll different shades of green to make leaves.


12. Have Fun!


Friday, October 29, 2010

Halloween Series...Halloween Cupcake Tower


I am extending the Halloween series because I have a few more post to share with you and I am sure you do not want to miss them.

I am doing the happy dance here,because today Juanita of Sweet Things Blog is here showings us how to make this awesome cupcake tower and cake. I absolutely love the idea and what I like most is that I am sure any of you with or without experience is capable to do it. Juanita is a talented baker and Cake Designer in Toronto, Canada who specializes in custom designed cakes and cupcakes for all occasions. Since I discovered Juanita's blog I have been going there as one of my sources of inspiration for my own cakes. Juanita recently got marry and she created an amazing cake and  display of sweet treats for all her guest, stop by her blog and look around, you will love it.

This is Juanita...

Happy Halloween Everyone! Thank you to Kathia for putting together all these fabulous ideas to lead us into Halloween. I've enjoyed every single post and happy to share with you this Halloween Cupcake Tower.


There are 4 cupcake designs: Mummy, Gravestone, Bat in the Moon and a Ghost. The cupcakes were vanilla bean with vanilla swiss meringue buttercream.


1) Mummy - I formed the shaped of the mummy with sugarpaste and let it dry overnight. Then I cut thin slices of fondant and wrapped it around each one. Then added the eyes. These were now my inspiration for the cake.


2) Gravestone - I used my trusty Oval cutters to make the shape of the tombstone. I let them dry overnight. Then added them to another stone to stand them upright.


3) Bat in the Moonlight - I cut out gumpaste rounds and let them dry overnight. Using my oval cutter and my #12 Wilton tip - I made bat wings. Then added on a round face and the imprinted the eyes with a #2 Wilton tip.


4) Ghost - I know you've seen this popular design many times. I made cake bites (cake & buttercream mixed together) and then covered in fondant.


How to make a Mummy Cake Topper


Step 1: Stack and ice the cakes - I normally would use round cakes, but I had a 14" vanilla butter cake on hand. I cut the cake like the photo below, then iced and stacked it:


Step 2: Carve the Cake - I used the cupcake toppers as my inspiration to try to get the right shape. This was a chubby, short mummy. Remember to use a sharp knife and small cuts. Look from all angles. I was able to re-used some of the carved pieces to round out his head and make his arms.


Step 3: Ice and Cover the Cake - This cake is fun because you don't need perfectly smooth buttercream or edges. You also don't need to be a master at applying fondant. You can quickly ice the cake, then cut out long strips of white fondant and apply as if it really was a bandage. The messier, the more realistic. Now that's fun! Happy Caking!


Halloween Series...Day 28 Marzipan Finger Cupcakes Toppers


This is how my blog friend Faithy describes herself on her blog "Self-taught part-time wannabe baker and  cake decorator". I honestly thing she is so talented and she makes amazing cakes. This cake in particular is totally awesome. I have to say that I am a little frightened about these fingers, but they would look fabulous at your Halloween party.  Make sure you stop over Faithy's blog and say hi.
Faithy, your modelings skills are awesome! 


Thank you Kathia for inviting me to guest post! :D

Hi! I'm Faithy! I have no idea what Halloween is since we don't really celebrate here in Singapore.  So when Kathia of Pink Little Cake asked me if i would like to guest post in her Halloween series, i figured it would be fun and agreed.  How difficult would it be since I've seen gift shops selling halloween related stuff etc...?

I thought for a really really long time (almost a month since i opted to be the last in line ...) and couldn't come up with any ideas at all! Everyday I would read all these wonderful creations that other awesome guest-bloggers were creating. And as the date for my posting came nearer, i panicked!  So on Sat evening....so i rushed out to the shop and bought some halloween cutters and made these cookies....


However, because of my bad time management and no planning, I rushed through to ice these cookies on Sunday. My husband was nagging at me all the time to finish up quickly cos it was past midnight and I needed to get up early for work the next day.  Hence, I felt I didn't do a good job with these cookies.  

The next day, I thought about it again and decided that maybe i should make cupcakes! With the halloween theme, I'll make marizpan finger toppers for the cupcakes!  These, i thought to myself, would be soo cool!!   So, right after I came home from work, i sat down to mould these finger toppers with marzipan..   But while making these fingers from mazipan, i was quite disturbed and frightened..cos they began to look more and more realistic to me.  I wasn't sure at this point if i wanted to use them as cupcake toppers so i just took some photos of them as 'lollipops'.  


My husband came home, saw these and said i should cut off the stem to make them look more realistic - and he added that if i wanted to do something like that, i should make them look as realistic as possible. With his advice, I cut off the stem and they ended up looking even more frightening and morbid..!?!  I took these photos really quickly....as I was feel rather gross out...lol! 


Creepy isn't it?  Well, as i was saying, i was pretty disturbed, so i packed these fingers into a box and brought it with me to work the next day. I showed everyone who came to my office to see what they had to say about the fingers. Most took it as a matter of fact and didn't seem very disgusted or shocked.  Some even encouraged me to use it as toppers for my cupcakes..saying they don't mind eating the cupcakes even with these fingers on it. They thought it would be fun and in line with the halloween theme.  I was encouraged....but wasn't totally convinced.  Took me 2 days to think about it and the fingers sat in my office for 2 days before i had the courage to bring them back home again..hahaha...

Finally I made chocolate cupcakes with frosting and placed the marizpan fingers on each cupcake. So I ended up with these....


If you want the "shock" factor for your halloween party, i think these marzipan fingers are the way to go... definitely be the talk of the party!   :S

Finally, i'm sharing with you the recipe to chocolate cupcake (as seen in the photos above). It's very light, soft and moist just like what the book said it would be.  However, I didn't find it as chocolatey as i would like though..

Chocolate Sour Cream Cupcake 
adapted from the book Cupcakes! by Elinor Klivans


Ingredients:-
3 ounces unsweetened chocolate, chopped
1 cup unbleached all purpose flour
1/2 tsp baking powder
1/2 tsp baking soda
1/4 tsp salt
1/2 cup unsalted butter
1-1/4 cups sugar
2 large eggs
1 tsp vanilla extract
1/2 cup sour cream
1/2 cup milk


1. Preheat oven to 180c.
2. Melt the chocolate in microwave.
3. Sift flour, baking powder, baking soda and salt in a medium bowl and set aside
4. Beat the butter and sugar until fluffy about 2 mins using electric mixer
5. On low speed, mix in the melted chocolate. Scrape side of the bowl.
6. On medium speed, add eggs one at a time until each is blended into batter
7. Add vanilla and beat until mixture looks creamy, about 1 min
8. Mix in sour cream until no white streaks
9. On low speed, add half flour mixture, mixing to incorporate it. Mix in water, then mix in the remaining flour mixture until it is incorporated and the batter looks smooth.  
10. Spoon the mixture into cupcake cups and bake for 15-20mins (depending on size of the cup).


Thursday, October 28, 2010

Halloween Series...Day 27 Creepy Eyeball Cupcakes


When I got this idea about getting together a group of bloggers for a series of Halloween post I emailed Jessica and ask her if she new how to bake. I am absolutely sure you all know about her, she is a super talented blog designer with an amazing portfolio of beautiful blog designs, but I wasn't sure about her baking skills. She told me about her famous and super easy Halloween cupcakes and here we are...
Creepy Eyeball Cupcakes

Jessica has been designing blogs for quite a while,she designed mine and I absolutely love it.  Visit her page, she is opening her design list on Monday  so if you want to get on the list, hurry!


INGREDIENTS

1 box chocolate cake mix
1 can of vanilla frosting
1 package of eyeball bubble gum
1 tube of colored, edible gel


INSTRUCTIONS

Bake the cupcakes according to box. Frost cupcakes with vanilla frosting. Push down eyeball bubblegum in center of cupcake. Use red gel to create the "veins" of the eye.
The best thing about this recipe is that you can exchange the cake flavor for anything that you'd like and you can exchange the candy. I originally got this idea from Kraft Foods and changed the candy to what was available in the store!

Wednesday, October 27, 2010

Halloween Series...Day 26 Candy coated Rice Krispie Halloween treats!

 Maranda of  Jolts & Jollies

I'm so excited to introduce you to a bloggy friend of mine, Maranda of Jolts & Jollies blog. If you haven't met her yet, run to her blog. Maranda is an army wife, she is super funny and she enjoys cooking and sharing tons of recipes with us. I love this post because this is something that we can do with our kids, I am sure Cami would have a blast making these treats!
Thank you for this post Maranda, your daughter is adorable!
This is Maranda ...

Hi everyone!

Before we get started I just want to say that I am absolutely honored to be here. I have been following Kathia's blog for some time now and I am amazed at her talent.

And how wonderful is it that she has gathered some of the most talented individuals in the bloggy world for this "28 Days of Sweet Halloween Treats" series????

So far I have seen some absolutely amazing treats and ideas and I can still hardly believe Kathia thought of me for this series! Thanks Kathia, for giving me the honor of being a part of this series and offering me some time on your creative space.

October, Halloween especially, has always been a special time of the year for me. October is not only my birthday month but also my older sister's and now my great niece's birthday month as well!

And hello??? Halloween??? Yes!

Endless amounts of candy??? Yes, yes, YES!!!

As I was trying to decide what I wanted to offer for this series I changed my mind pretty much about a million times. I finally settled on something that is cute, yummy and that Little Butt could help me make.

So I present to you...


Candy coated Rice Krispie Halloween treats!

I enlisted Little Butt to be my sous chef for this project. So grab your little kitchen helper (or not) and let's get started!

To make these treats you will need to make a tray of Rice Krispie treats.


Start by measuring out all your ingredients and getting everything ready. Rice Krispie making happens fast once you get started. For these you will need:

6 cups Rice Krispies Cereal

a 10 ounce bag of regular sized marshmallows

3 Tablespoons unsalted butter


In a large pot, melt the butter.


Add in the marshmallows, stirring constantly until they are all melted. Then dump in the cereal and mix it all thoroughly to combine. With a spatula (it's best to spray with cooking spray) evenly spread the mixture into a sprayed/buttered/greased 13x9 inch pan or onto a baking sheet.

Once the treats are completely cool, take some cookie cutters and cut the treats into the shapes:


Now take your candy melts...


And follow the directions on the package to melt them in separate bowls (I actually did one color at one time and washed out the same bowl in between uses. I also used the microwave method).


Once your candy is melted, dunk in the cereal treats and make sure they are fully covered in candy. Oh man!


Then place the candy covered treats on a cooling rack to set. I left mine overnight.


Once they are dry...decorate the treats as you see fit. Then serve at a Halloween party or better yet...a Halloween birthday party!

Thanks again to Kathia for allowing me to contribute to this great series! I hope you all have enjoyed my little Sweet Halloween treat idea!

Tuesday, October 26, 2010

Halloween Series... Day 25 SugarVeil Spider Web Cake


About 2 and a half years ago,my friend Mary fell in love with fondant cakes  and today she is a part time Cake Designer and owns her own company "mary had a little cake,inc". Mary specializes in wedding cakes. She has won a couple of awards for her cake designs and loves to make people happy with her cake creations.

 I am so happy to have her here today showings us a fantastic technique in cake decorating, SugarVeil...


Hey, everyone! I don’t know about you, but I’ve been hooked on Kathia’s blog. I didn’t even have a blog profile or account until Kathia asked me a few weeks ago to be a guest for her 28 Days of Sweet Halloween Ideas. Now I’m totally addicted! Thank you, Kathia. I’m so flattered that you included me in this very talented group of bakers and artists!


SugarVeil Spider Web Cake


My real passion is in making elegant wedding cakes, so I designed this 3 tiered spider web cake. This is so simple, but very striking. It would be a great centerpiece for an elegant, but festive Halloween party.

I get inspiration from all sorts of places and the inspiration for this cake came from this fun cake stand I found in Marshalls

 First I covered the tiers with orange fondant.


I made a fondant snake border for around the base of all the tiers, by using a clay gun.


The snake was adhered to the cake with piping gel.


Now the fun starts! I love, love, love SugarVeil! I was inspired to use this product, remembering that Lauri Ditunno used it for her popular ‘skull wedding cake’ on season 1 of Amazing Wedding cakes. She used SugarVeil for the web.

Sugarveil is so versatile and easy to use. Check out the company’s website before you use it (they have a website with videos, ideas, etc. ) The directions come right on the packet, so I won’t give them to you here. To make a black web, I added black liquid food coloring (and decreased the water amount). If you’ve never used SugarVeil…don’t add black coloring…it makes it very sticky …see towards the end of the tutorial for what to do instead.


.Use the paddle attachment on your kitchen aide and use a timer, because the amount of mixing time is crucial. If you mix it too much, it gets too thick. After the SugarVeil is mixed, place it in a piping bag fitted with a number 1, 0 or 00 tip.


To make the SugarVeil web, I traced this purple craft paper and some clipart I found online. I put the images under a 12 x 12 plastic or acetate scrape booking sleeve and rubbed a thin layer of shortening on the plastic. This is done so that the dried SugarVeil easily lifts off the plastic.


Pipe your design with the SugarVeil and let it sit overnight. I added silver disco dust to my black SugarVeil while it was wet to make it glittery. You can’t see it in the photos of the cake, but in person, it is very shiny! Love that disco dust!


After a day or so, I then lifted the SugarVeil from the plastic and the webs were adhered to the cake with nothing at all. It was very sticky on the underside because of the Crisco.


*******FOR THOSE OF YOU WHO”VE NEVER USED SUGARVIEL*******


This is important: If you’re using SugarVeil for the first time, you might want to keep the SugarVeil white or make it white and then spray it with black airbrush color (like in these pictures) This is because, when you add black food coloring to SugarVeil, it gets very soft and sticky and is very difficult to handle.


Oh, yes, the spiders…I almost forgot…they are not edible. They’re real!!! No. I got a big bag of plastic bugs from the party store.

To see more of my cakes visit my facebook page; http://www.facebook.com/maryhadalittlecakeinc


Thank you again, Kathia. I think I had more fun creating this tutorial than I did making the cake! It must be the teacher in me. Happy Halloween everyone!!